: A Complete Guide for Mechanical, DIY, and Custom Setups")
Building your own keyboard in 2025 has never been easier, thanks to hot-swappable PCBs, beginner-friendly kits, and advanced firmware tools like QMK and VIA. Here’s how to do it.
- Choose your keyboard layout and decide between hot-swap or soldered builds.
- Purchase essential parts: PCB, case, plate, switches, stabilizers, and keycaps.
- Lube and install your stabilizers, then mount and solder (or hot-swap) your switches.
- Assemble the keyboard case and install your keycaps.
- Flash the firmware using QMK Toolbox or VIA, and test every key.
- Add mods like case foam or RGB if desired for extra flair.
By following these steps, you’ll get answer of this Question “How to build a keyboard” and a fully customized keyboard tailored to your preferences in sound, feel, and performance.
Why Build Your Own Keyboard?
The process of making your personal keyboard extends beyond being fashionable because it lets you customize both the tactile feedback and auditory response and visual design of your device. When you build your own keyboard from scratch you maintain total control of all design elements including the arrangement of keys and auditory characteristics of the device.
- A typing feel tailored to you (switch weight, sound profile, travel)
- Ergonomics that reduce wrist strain
- A lifelong hobby and thriving global community
- Long‑term repairability and component recycling
Faster actuation enables rapid inputs for gaming. For writers, tactile switches become their keys to providing a satisfying type feedback as they work. These are the switches for those who want to make a low-profile ergonomic split keyboard for minimizing wrist strain. A self-built board guarantees that you have a keyboard that suits your specifications. Also, it is a nice project for learning electronics and firmware flashing along with some basic soldering skills.
Types of Keyboards You Can Build
Mechanical Keyboards
The DIY keyboard community prefers mechanical keyboards because they provide limitless customization options. Users select their switch types from linear, tactile or clicky options and decide their keyboard layout among 60%, 65%, and TKL options and select keycap materials and profiles. Users have the choice between hot-swappable PCBs that offer convenience and soldered PCBs that provide greater flexibility.
Membrane and Rubber-Dome Builds
While not as popular as mechanical builds, DIY membrane keyboards are a budget-friendly way to experiment. These involve hand-wiring or layering conductive sheets with domes. They’re perfect for learning the basics of keyboard matrix design and custom microcontroller programming.
Ergonomic and Split Keyboards
The construction of a split or Alice-style keyboard serves people who focus on ergonomics or need to lower their wrist strain. These layouts position their keys in natural positions which prevents repetitive stress injuries. The modern ergonomic kits include hot-swap sockets which simplifies keyboard building for beginners.
Ortholinear and 40% Boards
Ortholinear keyboards use a grid layout, where keys are arranged in straight columns. 40% keyboards are ultra-compact and usually require heavy use of layers to access all functions. These are ideal for travel or minimal desk setups.
Gaming vs. Typing Builds
The choice of keyboard switches depends on gamer preferences because linear switches provide speed advantages while typists choose tactile or clicky switches for their feedback. You can design a keyboard to enhance both your performance levels and comfort according to your main application requirements.
What You Need to Build a Keyboard
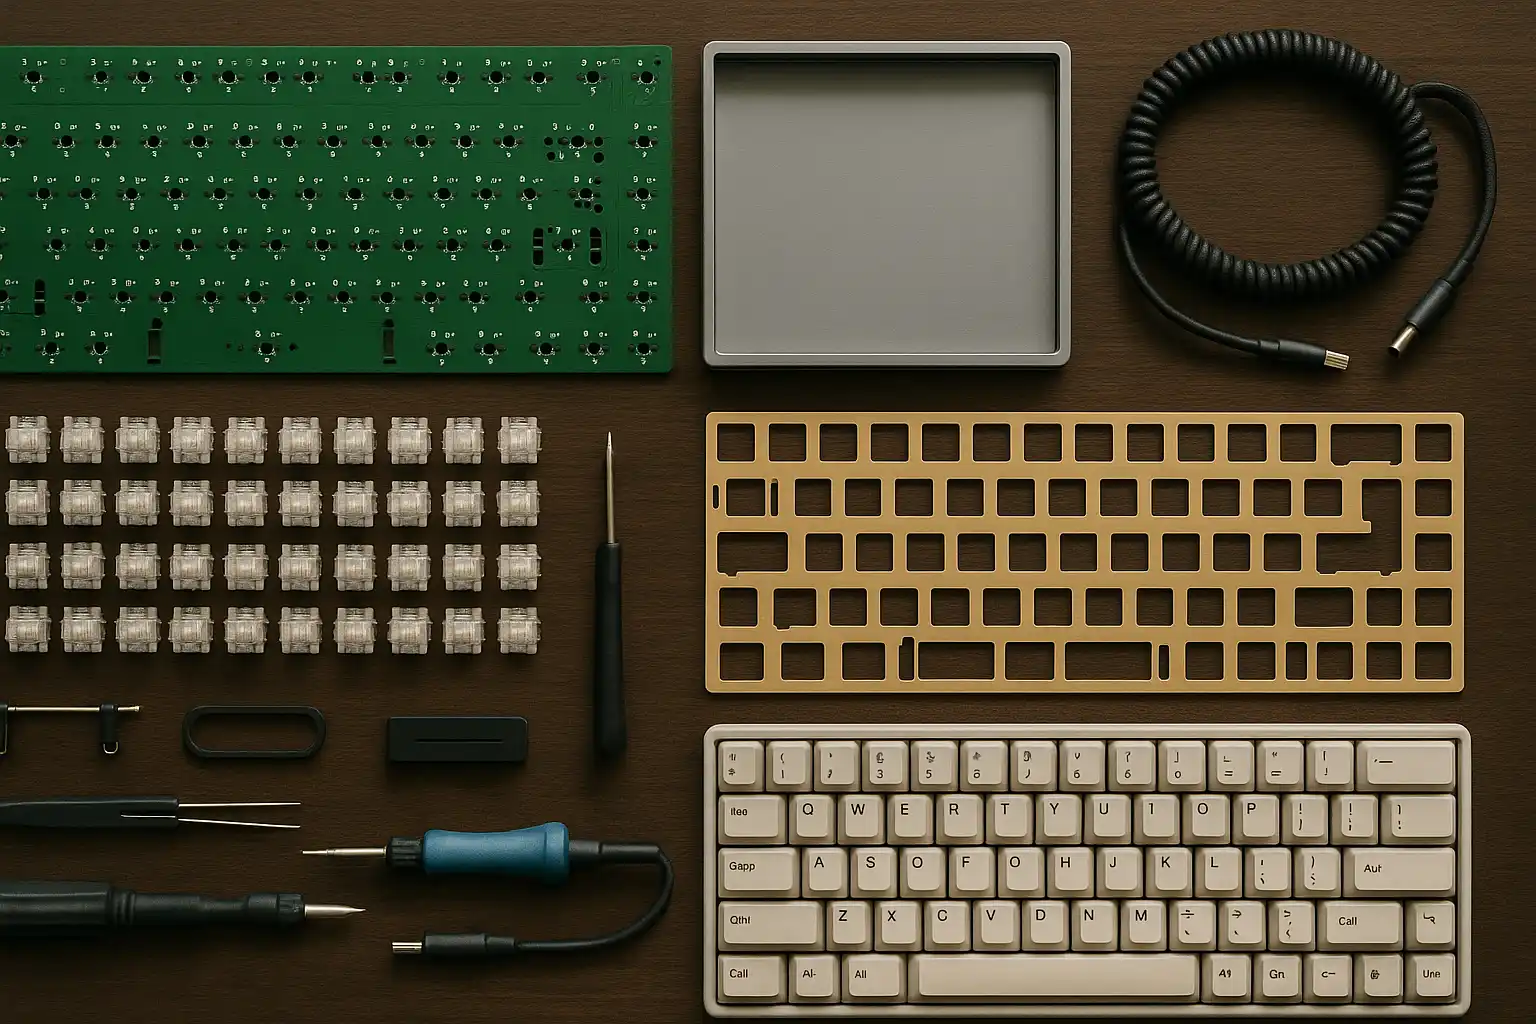
Before you start, you’ll need to gather all the necessary components and tools. Here’s a breakdown:
Core Components
| Component | What It Does | Tips |
| Case | Holds everything together | Aluminum isolates sound, plastic is lighter |
| PCB | The “brain” that scans keys | Hot‑swap sockets skip soldering |
| Plate | Adds rigidity and sound character | Polycarbonate = softer, brass = bright |
| Switches | Determine feel and sound | Buy 10 % extra for spares |
| Stabilizers | Keep large keys steady | Clip‑in is easier than screw‑in for starters |
| Keycaps | Final texture and profile | PBT resists shine longer than ABS |
| Cable/Battery | Connect or power your board | For wireless, add Li‑Po and charger circuit |
Essential Tools
- Keycap and switch puller
- Screwdrivers set and tweezers
- Soldering iron and solder (if needed)
- Tweezers
- Lubing supplies (brushes, lubes, films)
- Firmware software (QMK Toolbox or VIA)
These tools and components are your foundation, and choosing quality parts ensures a satisfying end result.
Pro tip for voice search: Ask “Hey Assistant, what tools do I need to build a keyboard?” and read the list above aloud while you shop
How to build a keyboard
Step 1: Choose Your Layout and Size
Your first decision should be layout. Are you a full-size keyboard user who needs a number pad? Or do you prefer a minimalist 60% layout that gives more desk space? Layouts like 65% and TKL (tenkeyless) are good middle grounds. Each layout has pros and cons in terms of portability, function access, and typing ergonomics.
Step 2: Hot-Swap vs. Soldered Builds
Hot-swap keyboards enable users to take out switches and install new ones without needing soldering work. These devices serve as the ideal choice for people who want to test different switches during their beginning phase. Soldered builds enable users to create any layout they want and achieve better durability but they need soldering abilities.
Step 3: Wired vs. Wireless
Do you prefer a clean, wire-free look or the reliability of a wired connection? Wireless builds are great for minimal setups but require batteries and extra firmware work. Wired builds are simpler and often have lower latency.
Step 4: Budget Planning
Set your budget early. A decent hot-swap keyboard can be built for around $100. Going full custom with high-end switches, artisan keycaps, and an aluminum case can easily exceed $400.
How to Build a Mechanical Keyboard (Step-by-Step)
Step 1: Prepare Your Workspace
Set up a clean, well-lit area. Lay out all your parts and tools. Use containers or trays to organize screws and components. If soldering, place a silicone mat and keep a fume extractor handy.
Step 2: Lube and Install Stabilizers
Lube your stabilizers with dielectric grease or Krytox for a smoother key press. Clip any plastic legs if needed. Insert them into the PCB and make sure they sit flush. Properly lubed stabs eliminate rattling and improve typing feel significantly.
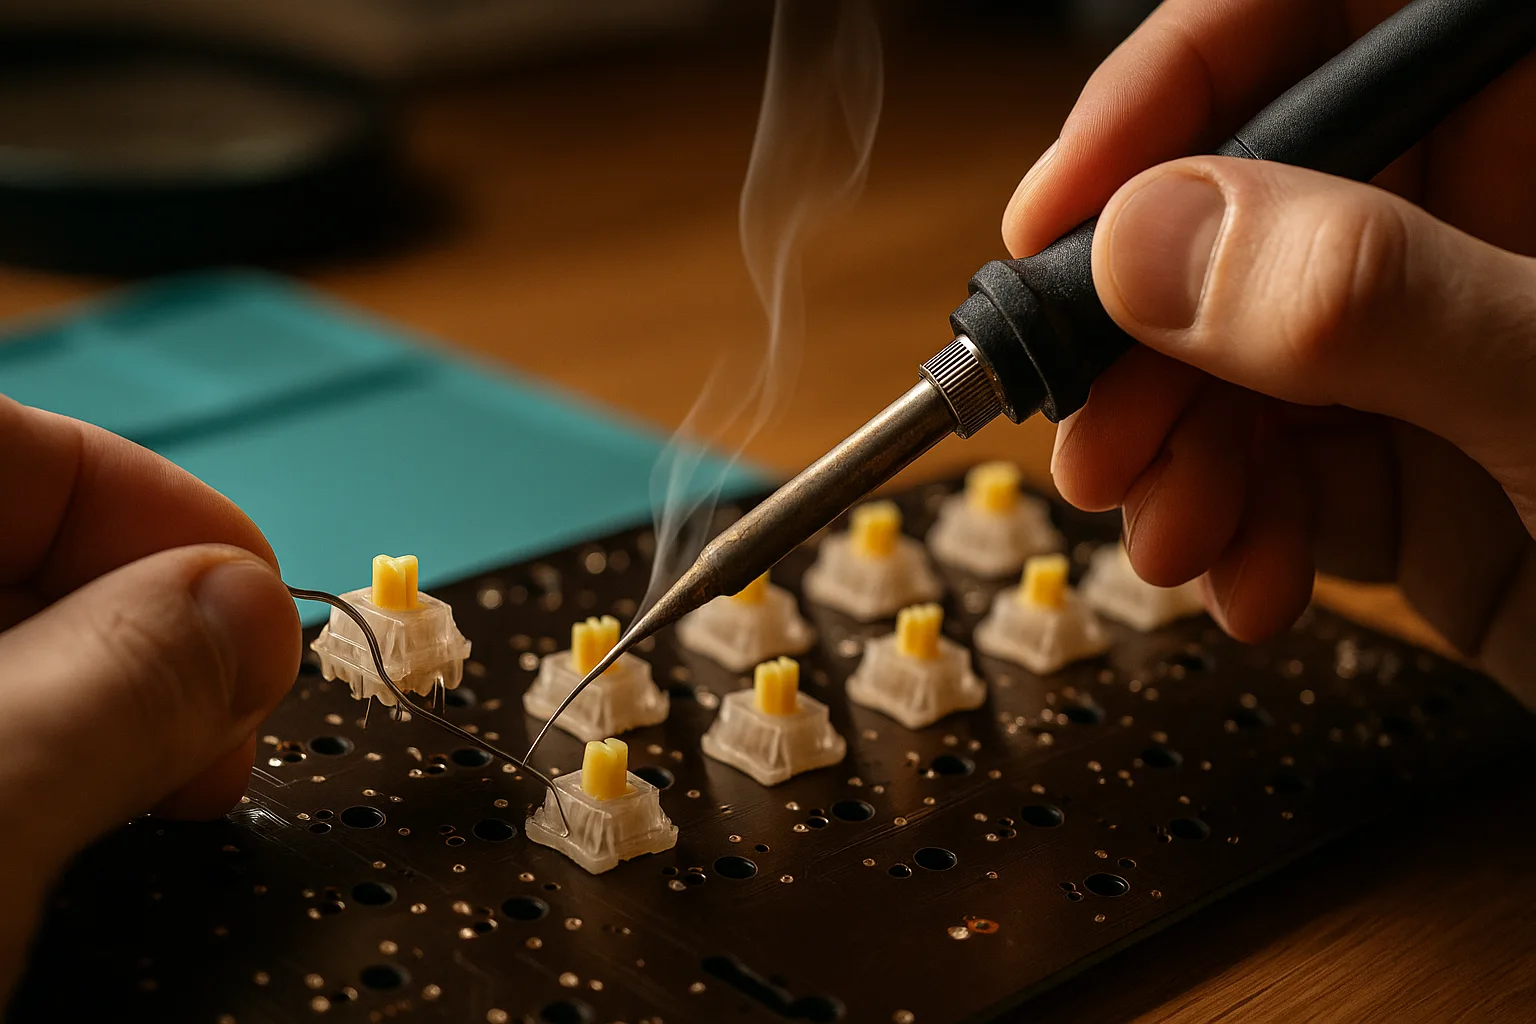
Step 3: Install and Solder Switches (if applicable)
If you’re using a soldered PCB, place switches into the plate and align their pins with the PCB holes. Flip the PCB and carefully solder each pin. Don’t overheat—a shiny, domed solder point means a good connection.
If using a hot-swap board, simply press each switch into the socket until it clicks into place. Be gentle to avoid bending the pins.
Step 4: Assemble the Case
Once all switches are installed, place the plate and PCB into the case. Insert screws in a diagonal pattern to evenly distribute pressure. Add foam or dampening material between layers if desired for better acoustics.
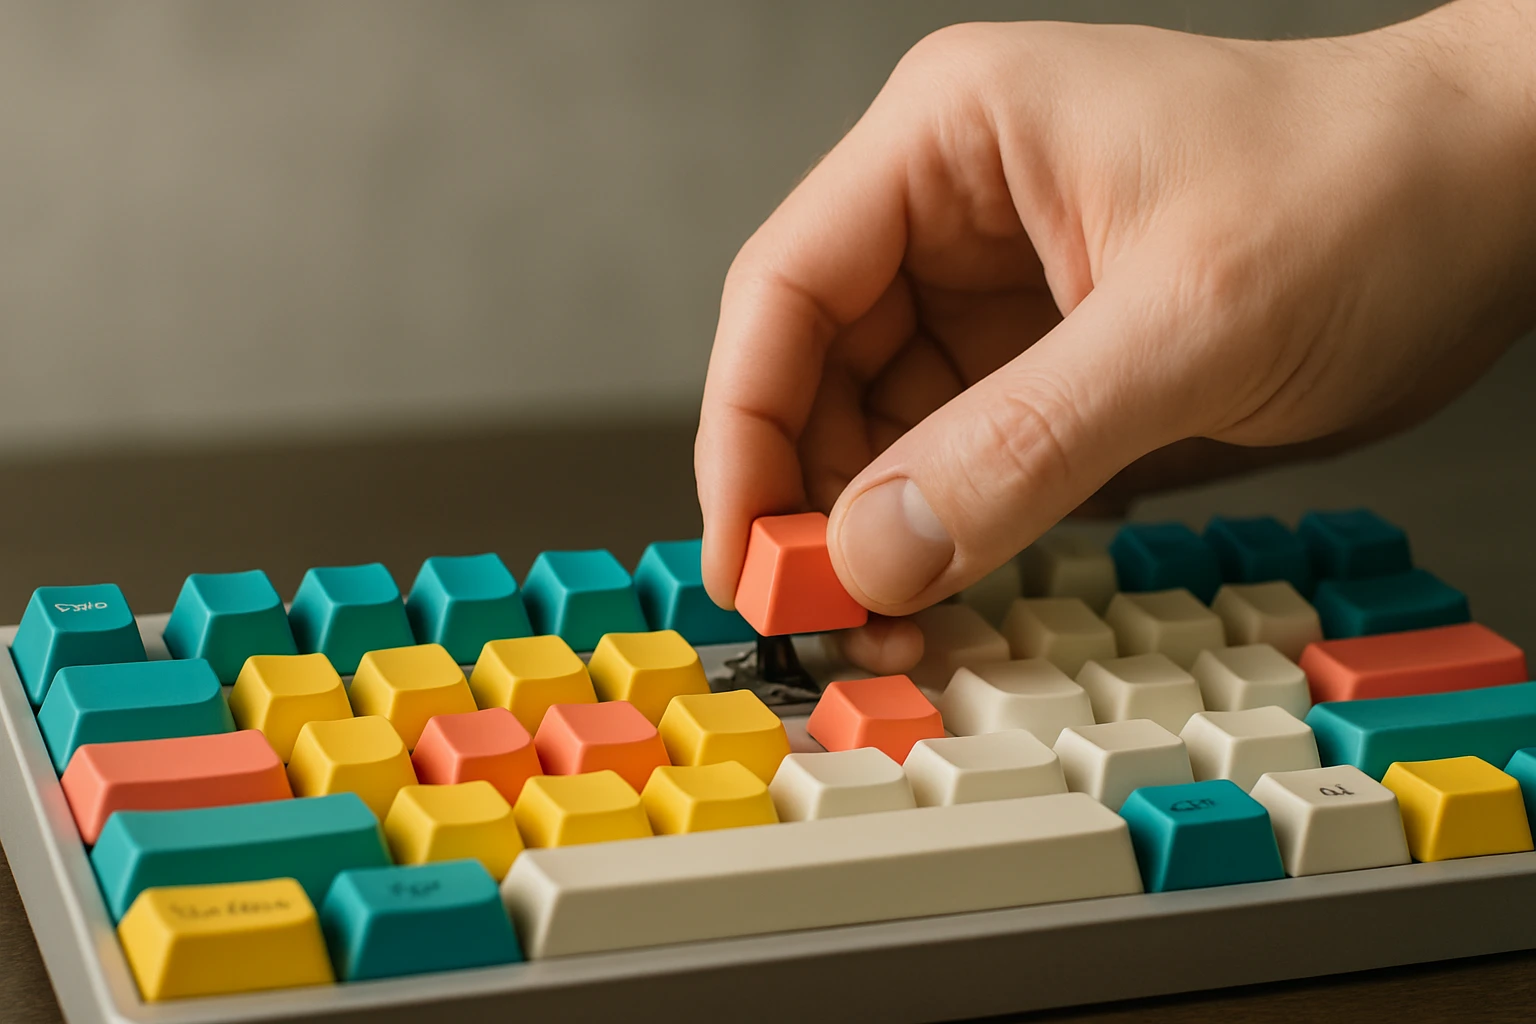
Step 5: Install Keycaps
Match your keycaps to the correct row profiles (e.g., R1 to R4) and gently press them onto the switch stems. Take your time with larger keys to ensure the stabilizers align properly.
Step 6: Flash the Firmware
Use QMK Toolbox or VIA to flash your keymap. QMK is more customizable but requires compiling firmware. VIA offers a user-friendly GUI for real-time key remapping. Load your desired layout, test each key, and ensure all functions work.
Step 7: Test Everything
Use an online keyboard tester to ensure every key registers. Re-solder or re-seat any that don’t. Make sure the spacebar, enter, and backspace keys feel smooth and sound consistent.
Building a DIY Membrane or Rubber-Dome Keyboard
DIY membrane builds make excellent educational activities for people who enjoy electronics and those who want custom-made items. A controller such as the Raspberry Pi Pico or Teensy serves as your initial selection. The next step involves creating a key matrix which functions as the wiring system that signals your controller about pressed keys.
You can build the matrix manually by connecting diodes to wires or you can print it with conductive ink or copper tape. After placing rubber domes or foam pads on the contact points you then assemble all layers into a custom-made case. Use QMK or CircuitPython to load your firmware on the device and validate your matrix functionality through multimeter testing or firmware tools.
This method provides a fundamental understanding of keyboard function despite its higher complexity when compared to mechanical builds.
Advanced Customizations
Once your build is complete, there are countless ways to enhance your keyboard:
Switch Lubing and Filming
Lubing reduces friction and noise, giving each key a smoother press. Films are thin inserts placed between the switch top and bottom housing to reduce wobble and improve acoustics.
Sound Dampening Mods
Add foam between the PCB and case or perform a “tape mod” by placing painter’s tape on the back of the PCB. This deepens the keyboard’s sound profile. You can also add silicone gaskets or foam between layers to isolate sound.
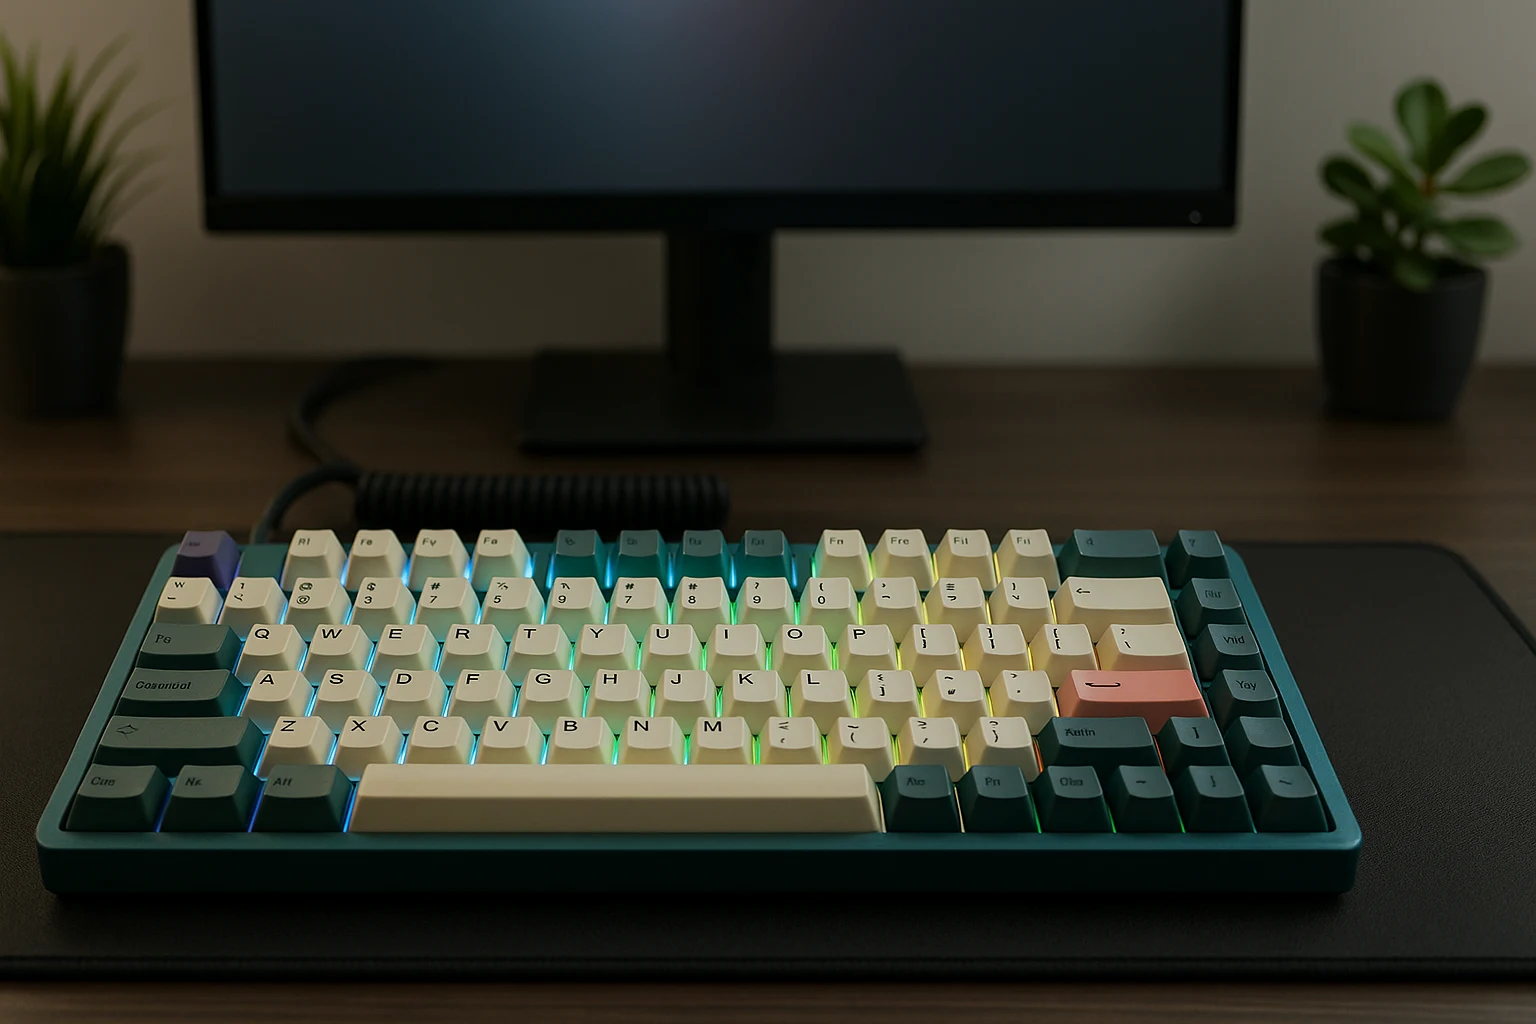
RGB Lighting and OLED Screens
Modern keyboards support per-key RGB lighting and even OLED displays. You can program reactive lighting effects or display custom graphics using QMK firmware updates.
These mods not only personalize your board but also improve its tactile and auditory experience.
Common Issues and How to Fix Them
Here are some common problems you might face during or after the build:
| Issue | Likely Cause | Quick Fix |
|---|---|---|
| Key not registering | Cold solder joint or bent pin | Re‑solder or reseat switch |
| Space bar rattle | Dry stabilizers | Apply dielectric grease or perform “holee mod” with tape (reddit.com) |
| Double typing | Debounce time too low | Increase debounce in firmware |
| PCB not detected | Wrong USB cable or bootloader | Use data‑rated cable, reset MCU |
Troubleshooting can be frustrating, but it’s also one of the most valuable learning steps in this process.
8. Recommended Kits and Tools (2025 Picks)
| Category | Model | Why It Rocks | Price |
|---|---|---|---|
| Beginner Hot‑Swap | Glorious GMMK 3 | Easy switch swaps, VIA compatible | $129 |
| Budget Wireless | Redragon K530 Draconic | 60 percent, tri‑mode | $59 |
| Mid‑Range 65 Percent | Keychron Q2 | Aluminum case, gasket mount | $189 |
| Premium Modular | Mountain Everest Max | Detachable numpad & dial | $239 |
| Tool Starter Pack | Hakko FX‑888D kit | Reliable iron, stand, tips | $110 |
See GamesRadar’s 2025 roundup for more hot‑swap favorites. gamesradar.com
FAQs
Can I build a keyboard without soldering?
Yes. Choose a PCB with Kailh or Outemu hot‑swap sockets and press switches into place without the need for a soldering iron. This makes the process faster and more beginner-friendly, especially for those nervous about electronics work.
Is it cheaper to build than buy?
Entry-level DIY builds can compete with or even beat the price of budget prebuilt keyboards, especially if you already have tools. However, premium custom parts like aluminum cases, high-end switches, and artisan keycaps will drive up the cost quickly. The value comes from customization, not always cost savings.
How long does a build take?
For a hot-swap keyboard, you can typically complete the build in about 30 minutes, especially if you’ve pre-lubed your switches. A soldered build takes longer around 90 minutes depending on your experience and how carefully you work through each step.
What is QMK versus VIA?
QMK is open-source firmware that gives you deep customization of keyboard functions, lighting, and macros but it requires some basic programming and flashing. VIA is a graphical interface that works on top of QMK-compatible boards, allowing real-time remapping of keys and layers without needing to recompile or reflash the firmware.
Final Thoughts
The process of constructing a keyboard in 2025 presents an exciting learning opportunity. The current landscape offers the most favorable conditions for new keyboard builders because of user-friendly tools along with budget-friendly kits and a vibrant keyboard community. The guide provides all the necessary information for starting your keyboard building project regardless of whether you want to enhance ergonomics or achieve better typing feel or improve gaming performance or simply enjoy crafting something original.
You can now build your board and customize your layout and flash your firmware to experience the satisfaction of using a keyboard which you constructed from scratch.
Happy building!